Creating Stories
To Create a New Storyteller Story, Complete the Following Steps in the CMS
Select the ‘Stories’ option from the menu on the left-hand side of the CMS
Click ‘New Story’ in the top right-hand corner of the Stories section to open the Story Editor
To add a title for the Story select the Edit Titles button. There are three types of titles to add, each lets you control the title of the story independently across separate locations:
Title: This is the internal title of the story, and helpful for adding internal identifiers such as game or language
Long Display Title: This will appear on any rectangular thumbs, where you have extra room to write longer titles
Short Display Title: This will appear below any circular thumbs, where you have less room for titles (You are also able to set mandatory Short Display Titles to within specific categories and to set a maximum length for these titles. Ensuring consistency and prevents title truncation in applications. Details on how to set are here)
After adding a title, your Story will be automatically saved as a draft so you can now exit and return to work on it at any time
Below the title, in the file area, there are three options for adding media to your Story:
'Upload Page' i.e. an image or video file (see supported file types here)
The ideal dimensions for a Page are 1080x1920px
The maximum size of a single Page is 100M
You can also drop files and folders to upload them as a Page.
'Add Engagement Unit' such as Polls or Trivia Quizzes
'From Studio' where you will be taken to the Studio editor where you can edit your Story, and pressing 'Save' will take you back to the CMS Stories section and display your saved Page
Uploaded, processed, and saved Pages can be reordered by dragging them into the correct position
When you return to the Stories list, the Story you were working on is automatically saved as a draft if you do not change the Story's status from 'Draft' to 'Published' in the dropdown box on the right.
The number in the top left corner for each Page is the position it will appear in your Story.


Other Actions You Can Perform in the Story Editor
Per Page Options
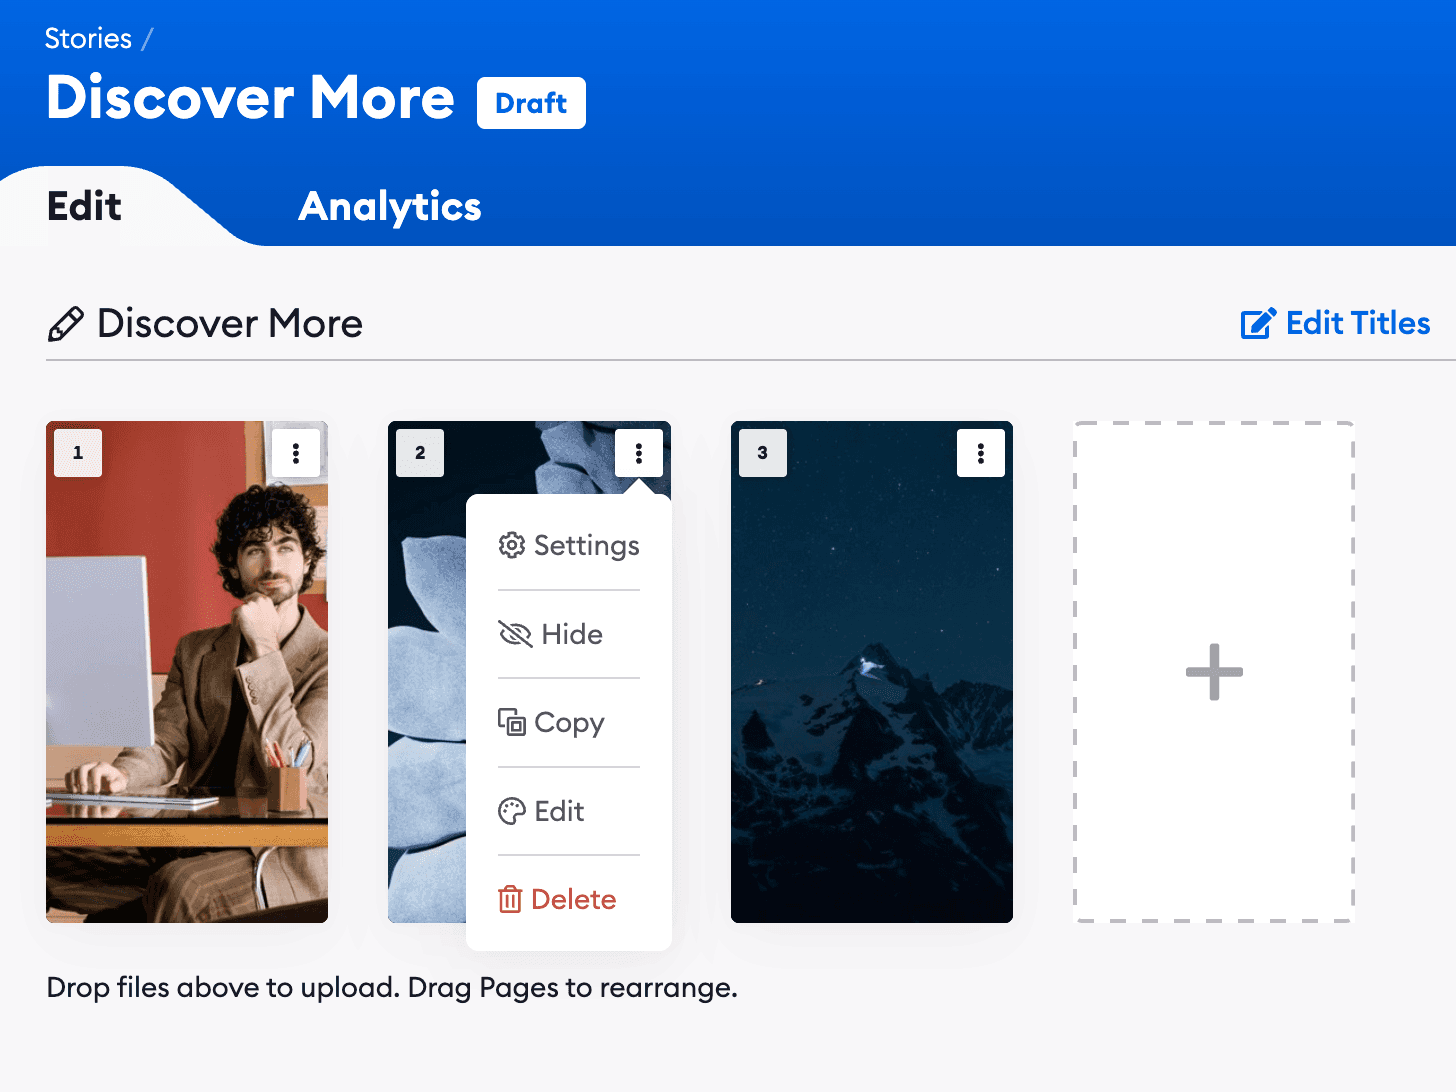
Each page has specific options, to view click the Kebab menu icon in the top right of each page. From here you can:
Delete the page
Edit the select page within the studio
Copy the Page to one or multiple Stories
Hide the page from appearing to users when published
Open the Settings
Per Page Settings
Click the Settings option. In this area you can:
Copy the Page deep link. With this, a user can navigate to this Page from anywhere outside your app.
Copy the Page's ID. You can use this to manually handle deep links.
Change the duration of a static Page. The default duration is 7 seconds.
Change the Page Title
Download the Page's original asset
Adjust Captions (if enabled)
Target Audiences on a Per Page basis
View the Page preview
Navigate throughout pages using the arrows
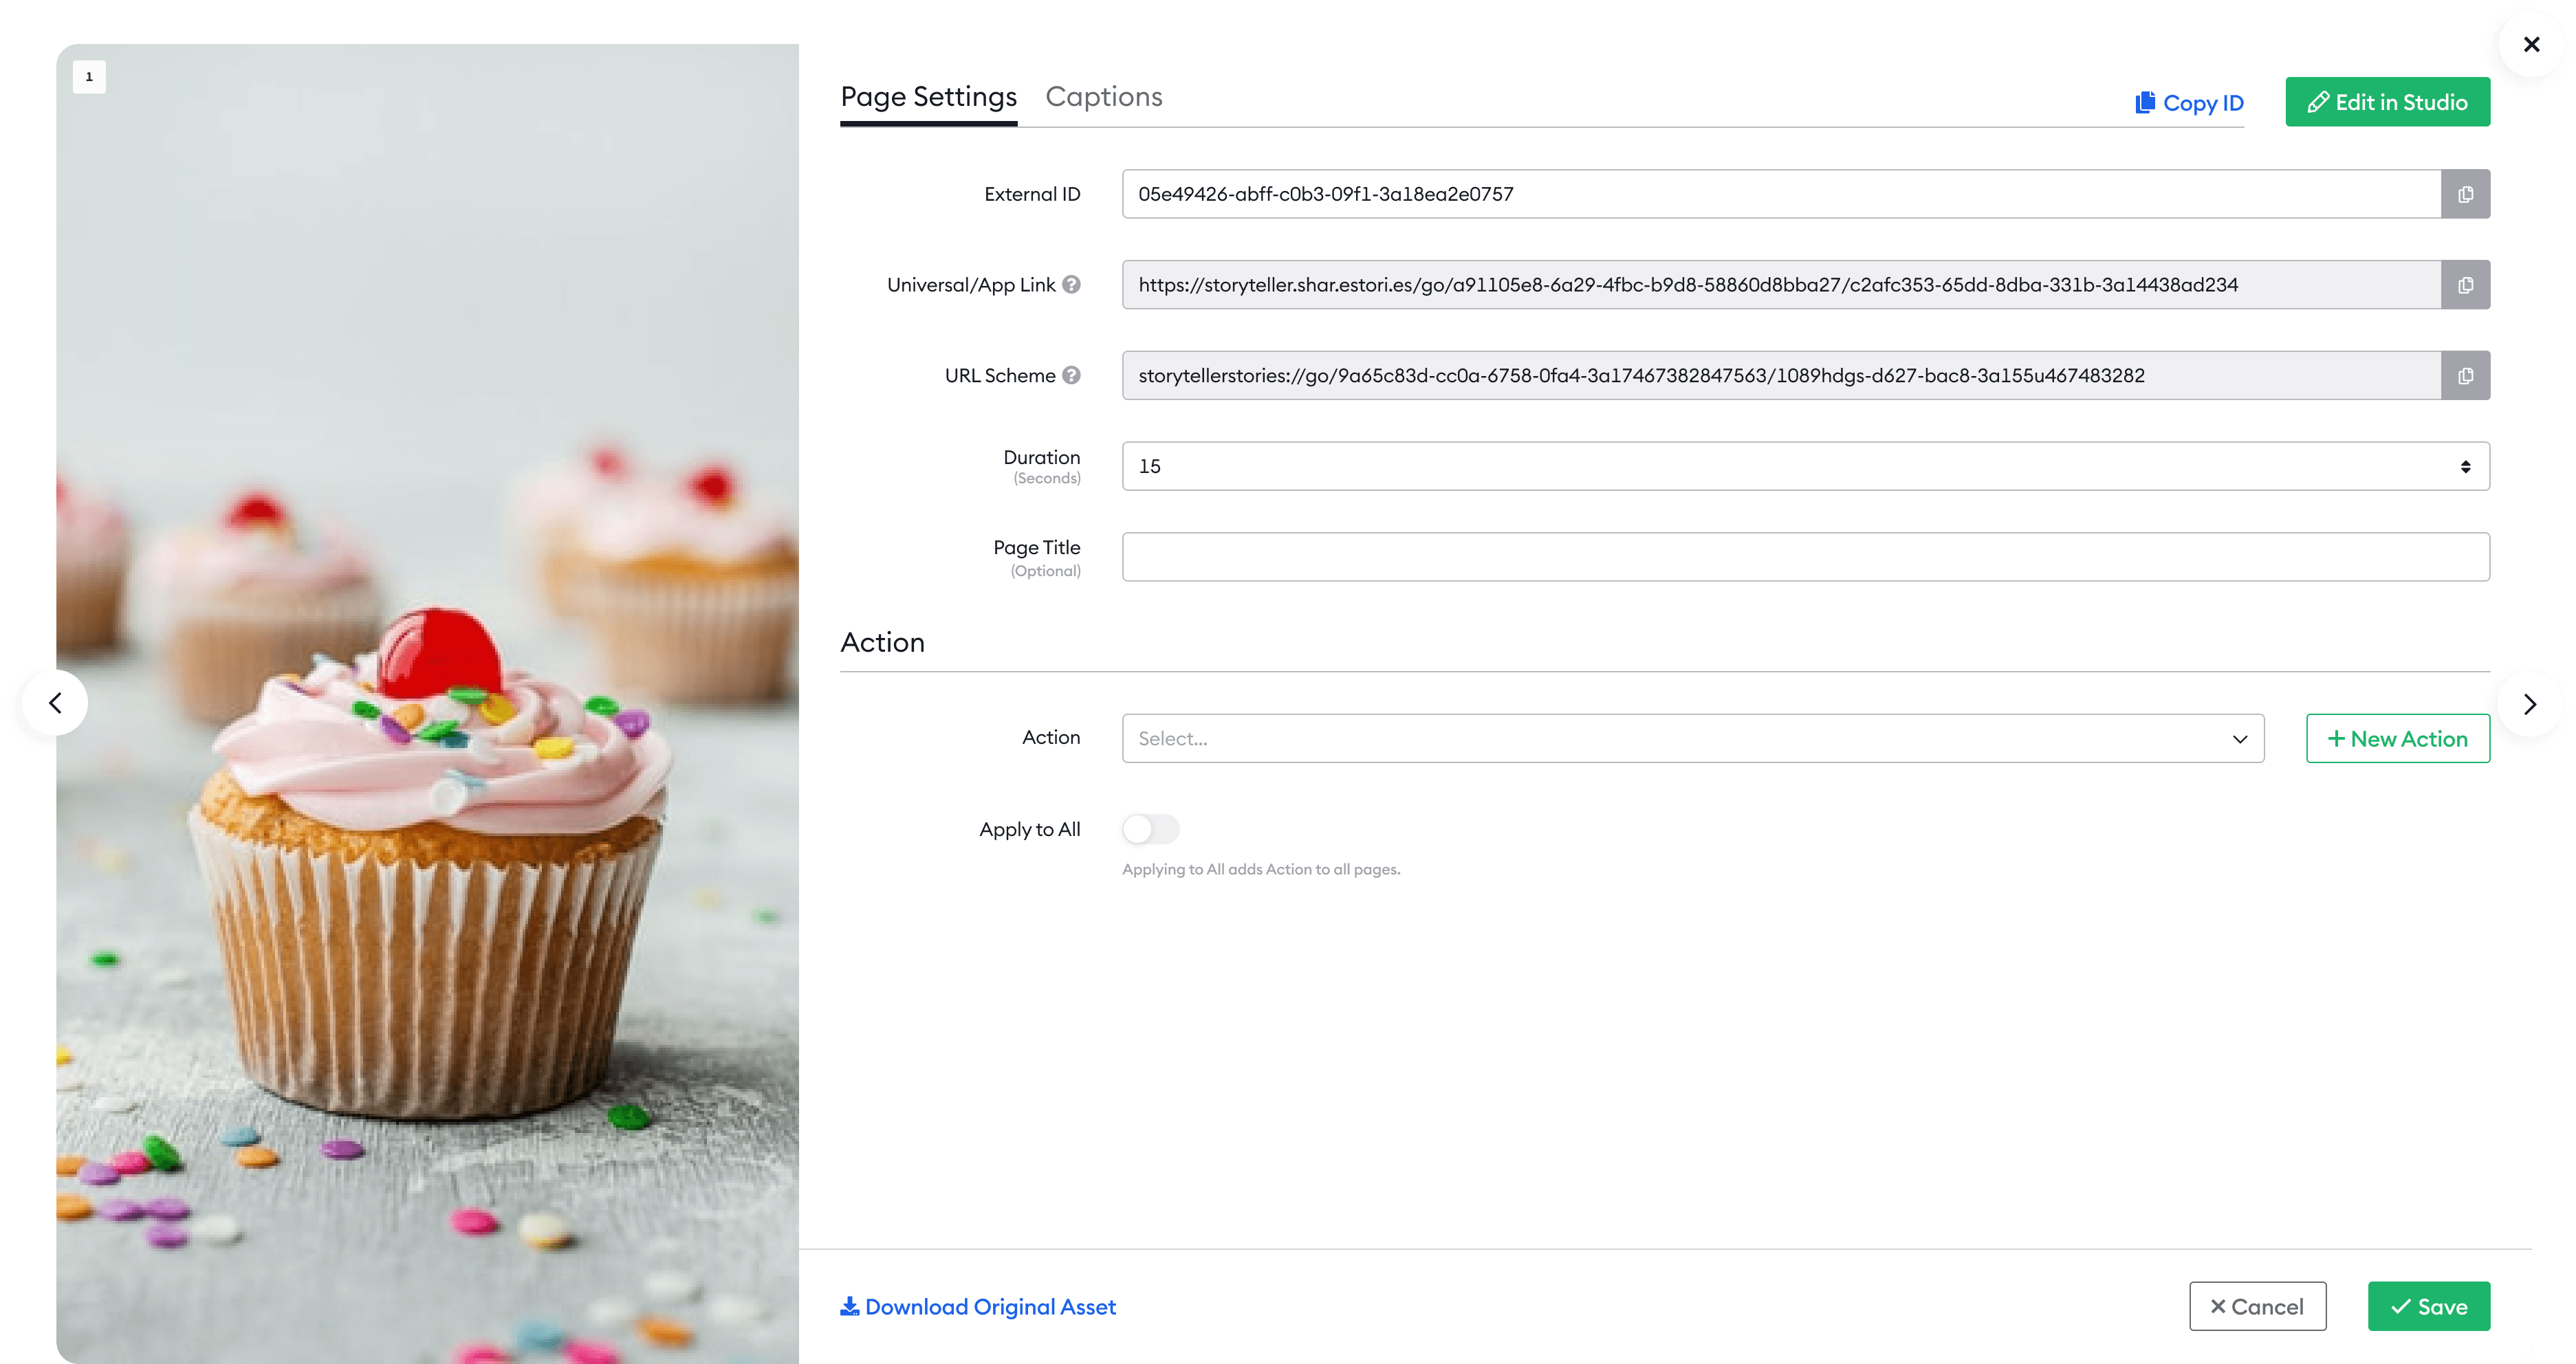
Add an Action
You can also add an action to a Page by following these steps in the Page Settings:
Select an Action that already exists from the actions dropdown menu.
Select "Add New Action" and create the new action (see Actions for more information). Once you navigate back to the Page settings modal, open the Actions dropdown menu and select or search for the action that was added.
Activate the UI toggle if you require a user prompt.
A small upwards arrow will be shown at the bottom of Pages with an Action attached to them.
Hide Story Pages
Within the Story Editor you can hide Pages that you do not want users to be able to see yet. This is useful for preparing content for an existing Story that is already live.
To hide a page:
Hover over the Page you would like to hide
Click the covered eye icon to hide that Page. A covered eye icon will appear over any Pages that are hidden.
To make a hidden Page visible again, simply click the eye icon again and it will be shown within that Story.
Scheduling Stories
After creating a Story, schedule the date and time it will appear on the app using the steps below:
Navigate to the 'Publishing' tab within the Story Editor
Select which Categories you wish your Story to be linked to using the selector or search bar.
From the selector you will be able to see each Category and it's:
Category Image (Thumbnail)
Display Title
Internal Title
Category Type
Default Schedule Icon (for Categories that have Default Schedule set)
Select 'Show in Category…' and select the Category and date/time from and to for each Category you would like the Story to appear in
Select the start and end date from the calendar - the Story can be live for any number of days
Set the start time and the end time - this can be set for any length of time
Once the time has been selected, to schedule your Story you will need to change the status from 'Draft' to 'Published'. If you wish to remove a Story from the schedule, click the bin icon next to the Scheduled Category/Date or change the Story back from "Published" to "Draft".
You can also add a Default Schedules to Categories, which will automatically apply a preset schedule to any Story using that Category. Details on how to set this up are here.
Once you have selected a Category and date for your Story, you can click the calendar icon to view what other Stories are scheduled for that Category.
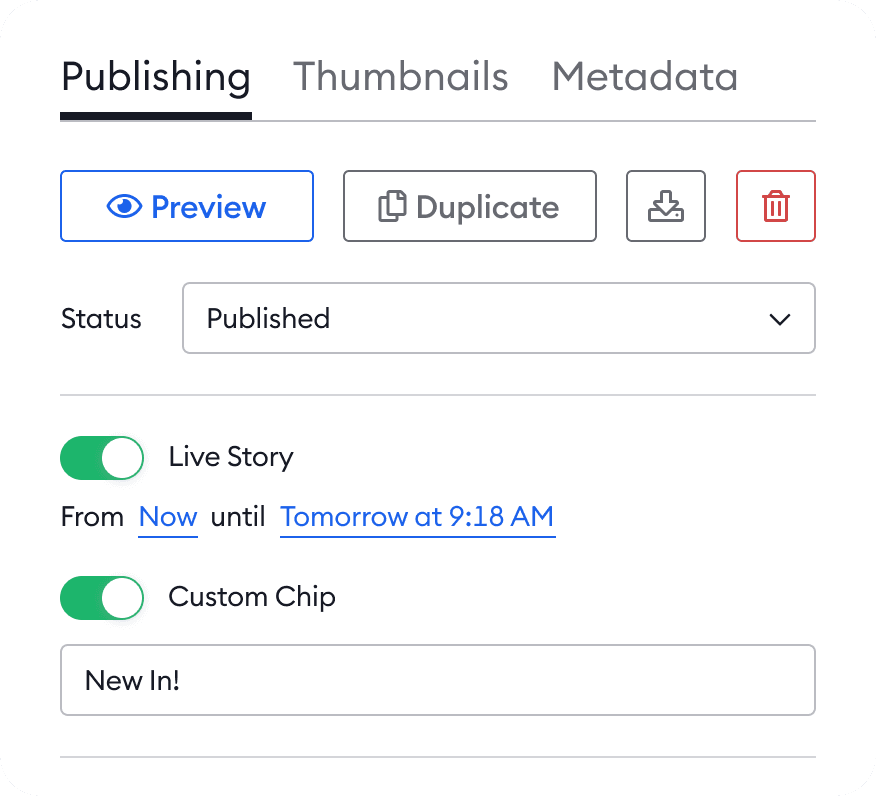
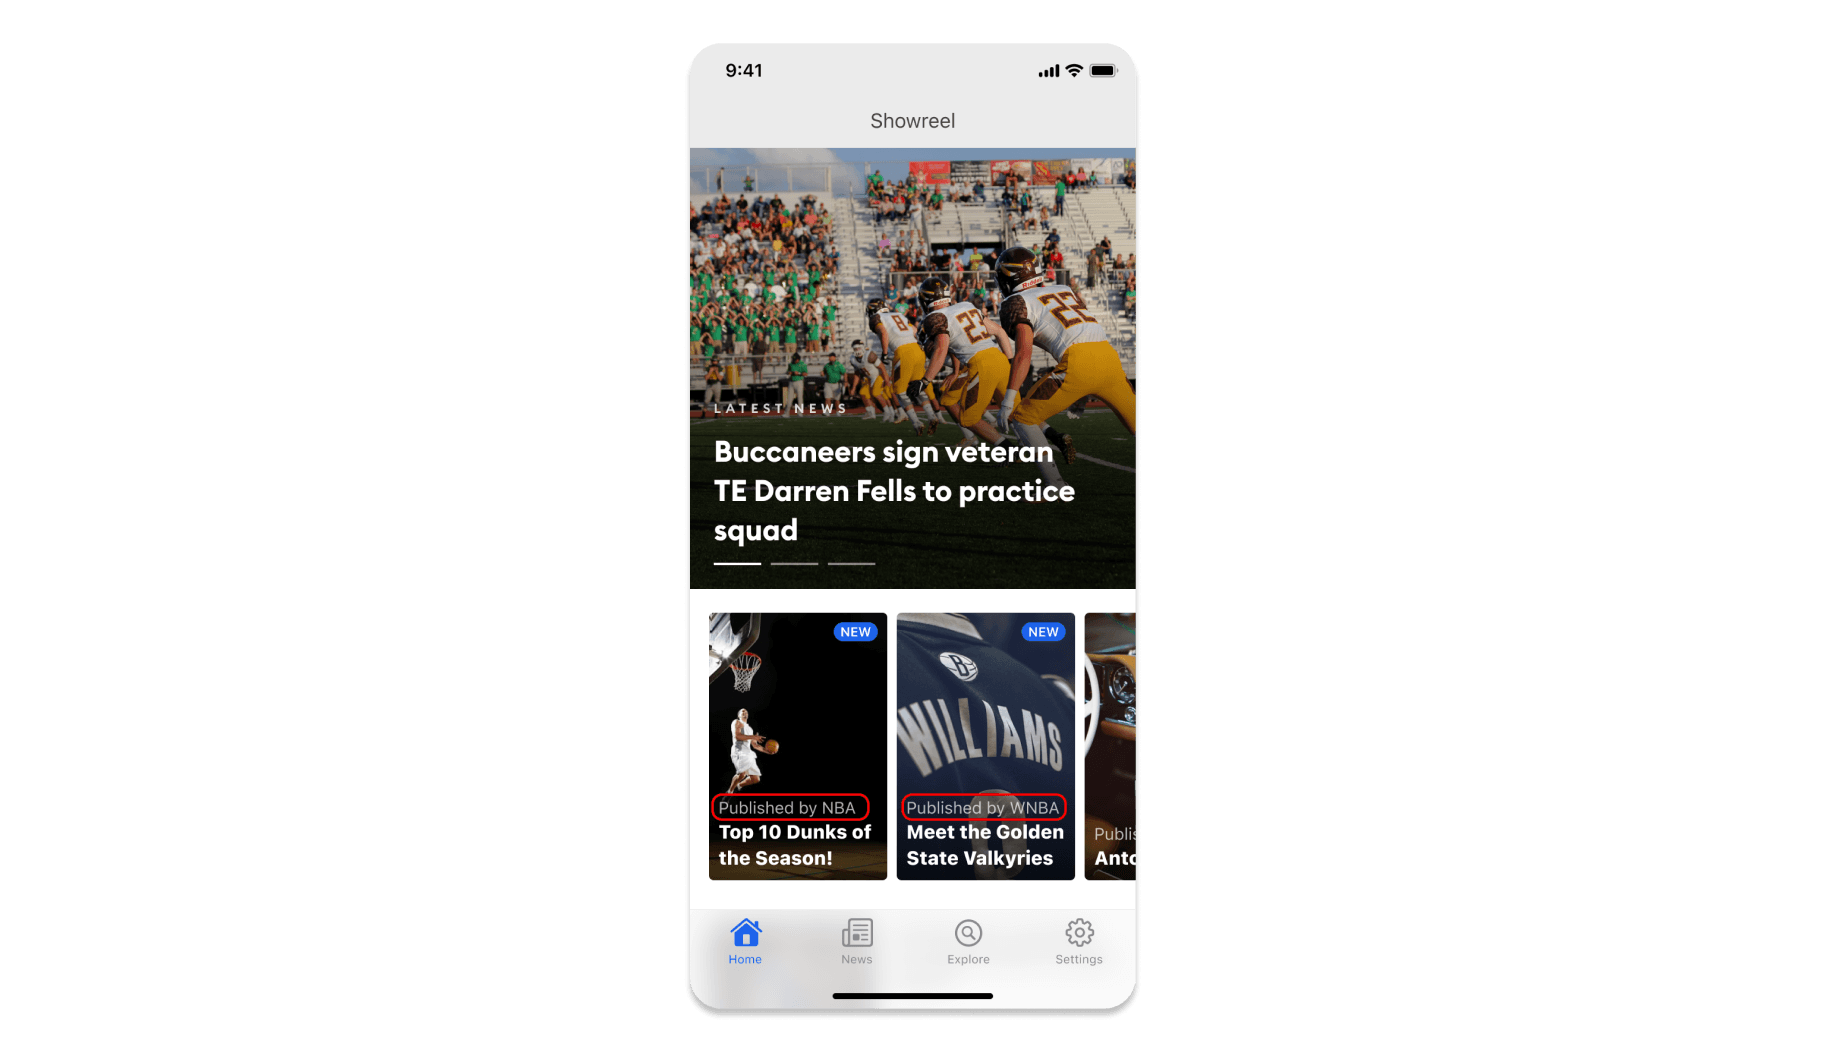
Live Stories
You can also choose to set a Story as a “Live Story”. Live Stories indicate that something is taking place now and encourages your users to engage with the content. When the Live Story toggle is turned on, the Story will automatically be shown as the first Story in a row or grid and a live indicator is added to both the thumbnail and the Story player to engage with users. A Live Story will also be shown as the first Story in Category schedules.
When selecting the Live Story toggle, you can choose to set how long the Story should appear as “Live”. Once the end time is reached, the Story will return to appear as an ordinary Story (with no live chip and it will no longer appear at the front of the row or grid) according to the schedule that has been set.
Stories will be set as live across all Categories that they are scheduled in. For example, if the Story is scheduled in the Home Category and in the Sports Category, it will show as Live wherever these Categories are displayed.
You can also alter the default 'Live' text that appears in the thumbnail chip to a custom input. This text can be up to 8 characters. To set:
Toggle on Live Stories as above and set your scheduling
Toggle on the newly appeared Custom Chip
Input your custom text
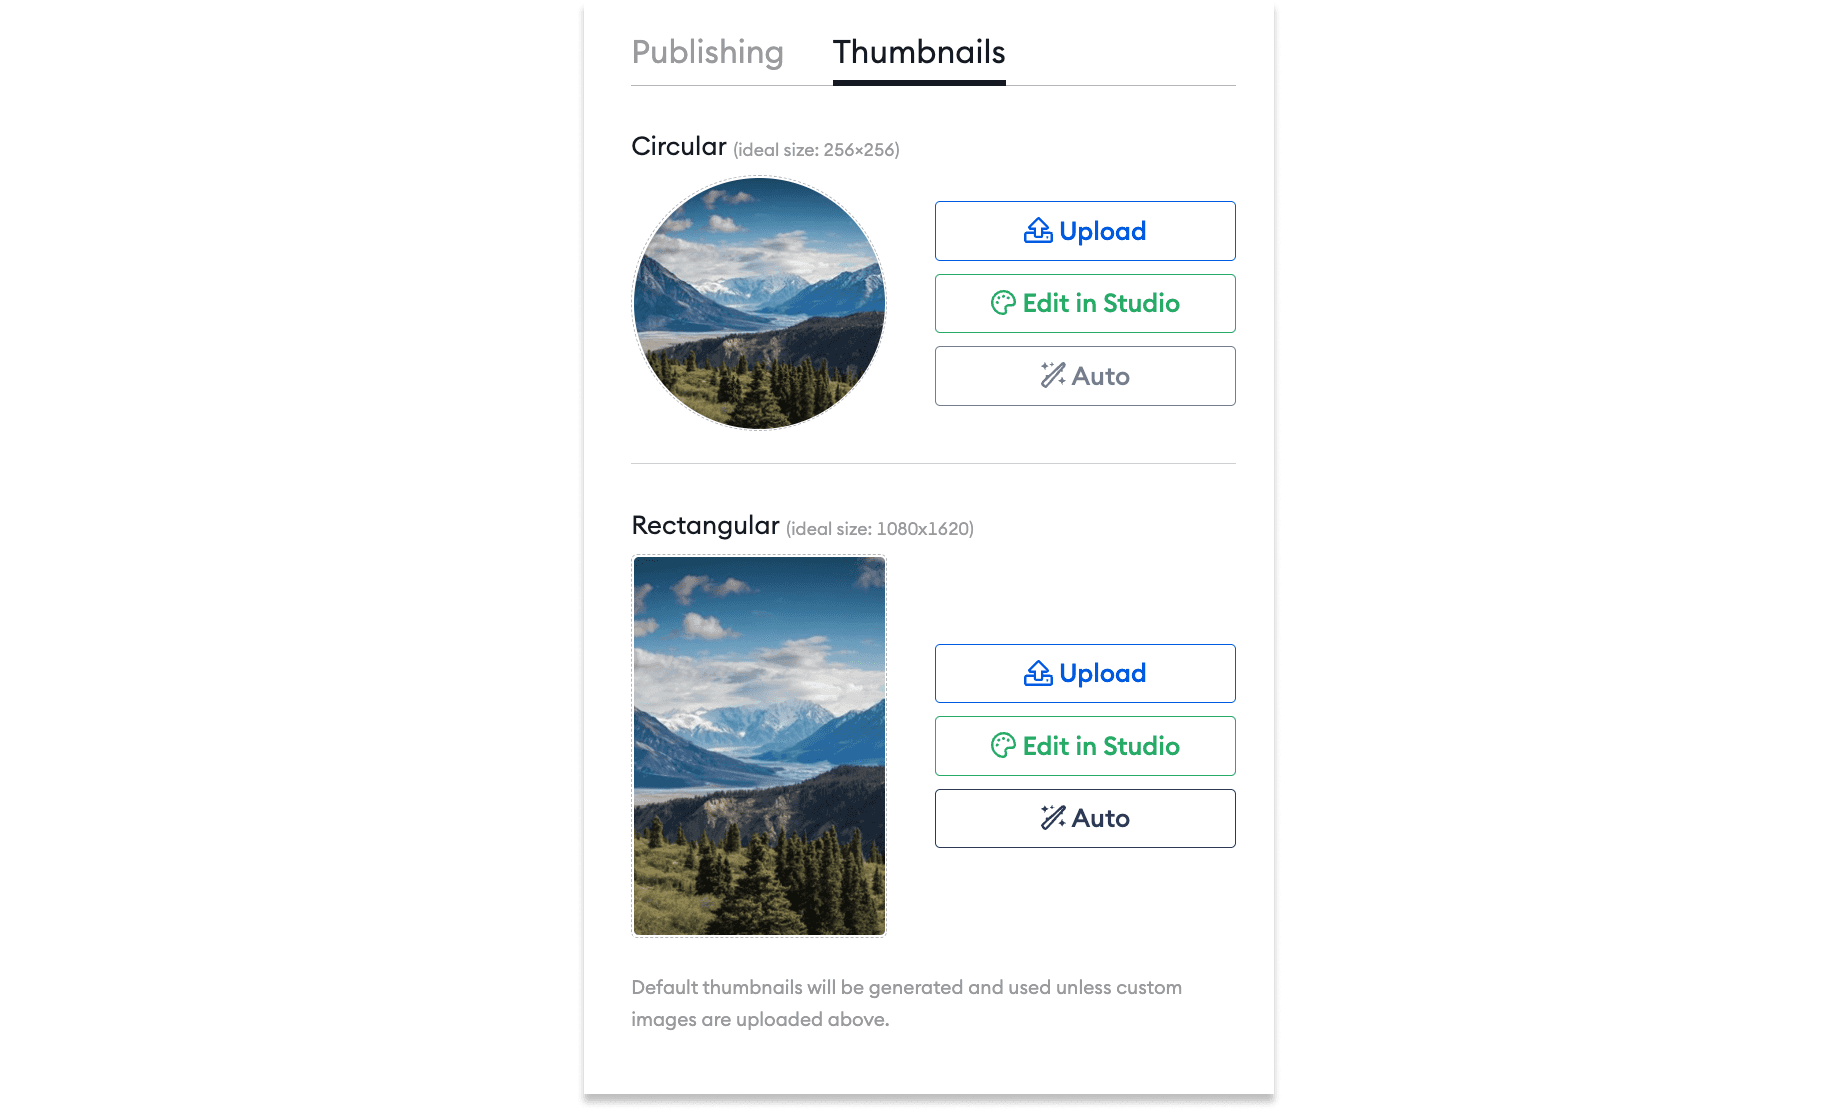
Change Story Icon and Thumbnail
By default, the Story display icon and thumbnail are automatically set to match the data in the first Page of your Story. To change your Story display icon and thumbnail, use the following steps:
Navigate to the ‘Settings’ tab within the Story Editor
Drag and drop your new image in the field or click to upload a file
The ideal dimensions for an icon are 256x256px
The ideal dimensions for a thumbnail are 320x480px
Edit in Studio - find out more about how to edit thumbnails in Studio here
Auto - this will reset the icon and thumbnail to the default
Adding Metadata to Stories
You can add metadata to a Story for use when exposing your Story as a Google Web Story. To do this:
Click the 'Metadata' tab within the Story Editor
You can then input the relevant metadata into both the 'Title' and 'Description' fields
Once finished press the 'Save' button

Previewing Stories
You can preview the Story on CMS to see how it will appear in your app and test any URLs added. To preview:
Click the ‘Preview’ tab within the Story Editor
You can then view each Page of the Story in full and navigate forwards and backward by tapping the right or left-hand side of the preview
To test the URLs, tap the Swipe Up UI displayed on the relevant Page(s)
You can stop and restart the Story at any point using the pause/play button below the preview
You can view with or without sound by using the speaker button below the preview

To share the CMS preview externally, toggle ‘Get shareable link’ then use the copy icon to save the link to your clipboard. Below is an example of a shared preview.

Duplicating Stories
You can also duplicate Stories, this will duplicate the entire story including it's thumbnails, categories, and title.
To duplicate a page:
Select the story you want to copy
Click the Duplicate button on the right-hand side panel
The duplicated story will now open with 'Copy' added to the end of the title to differentiate between the two versions.
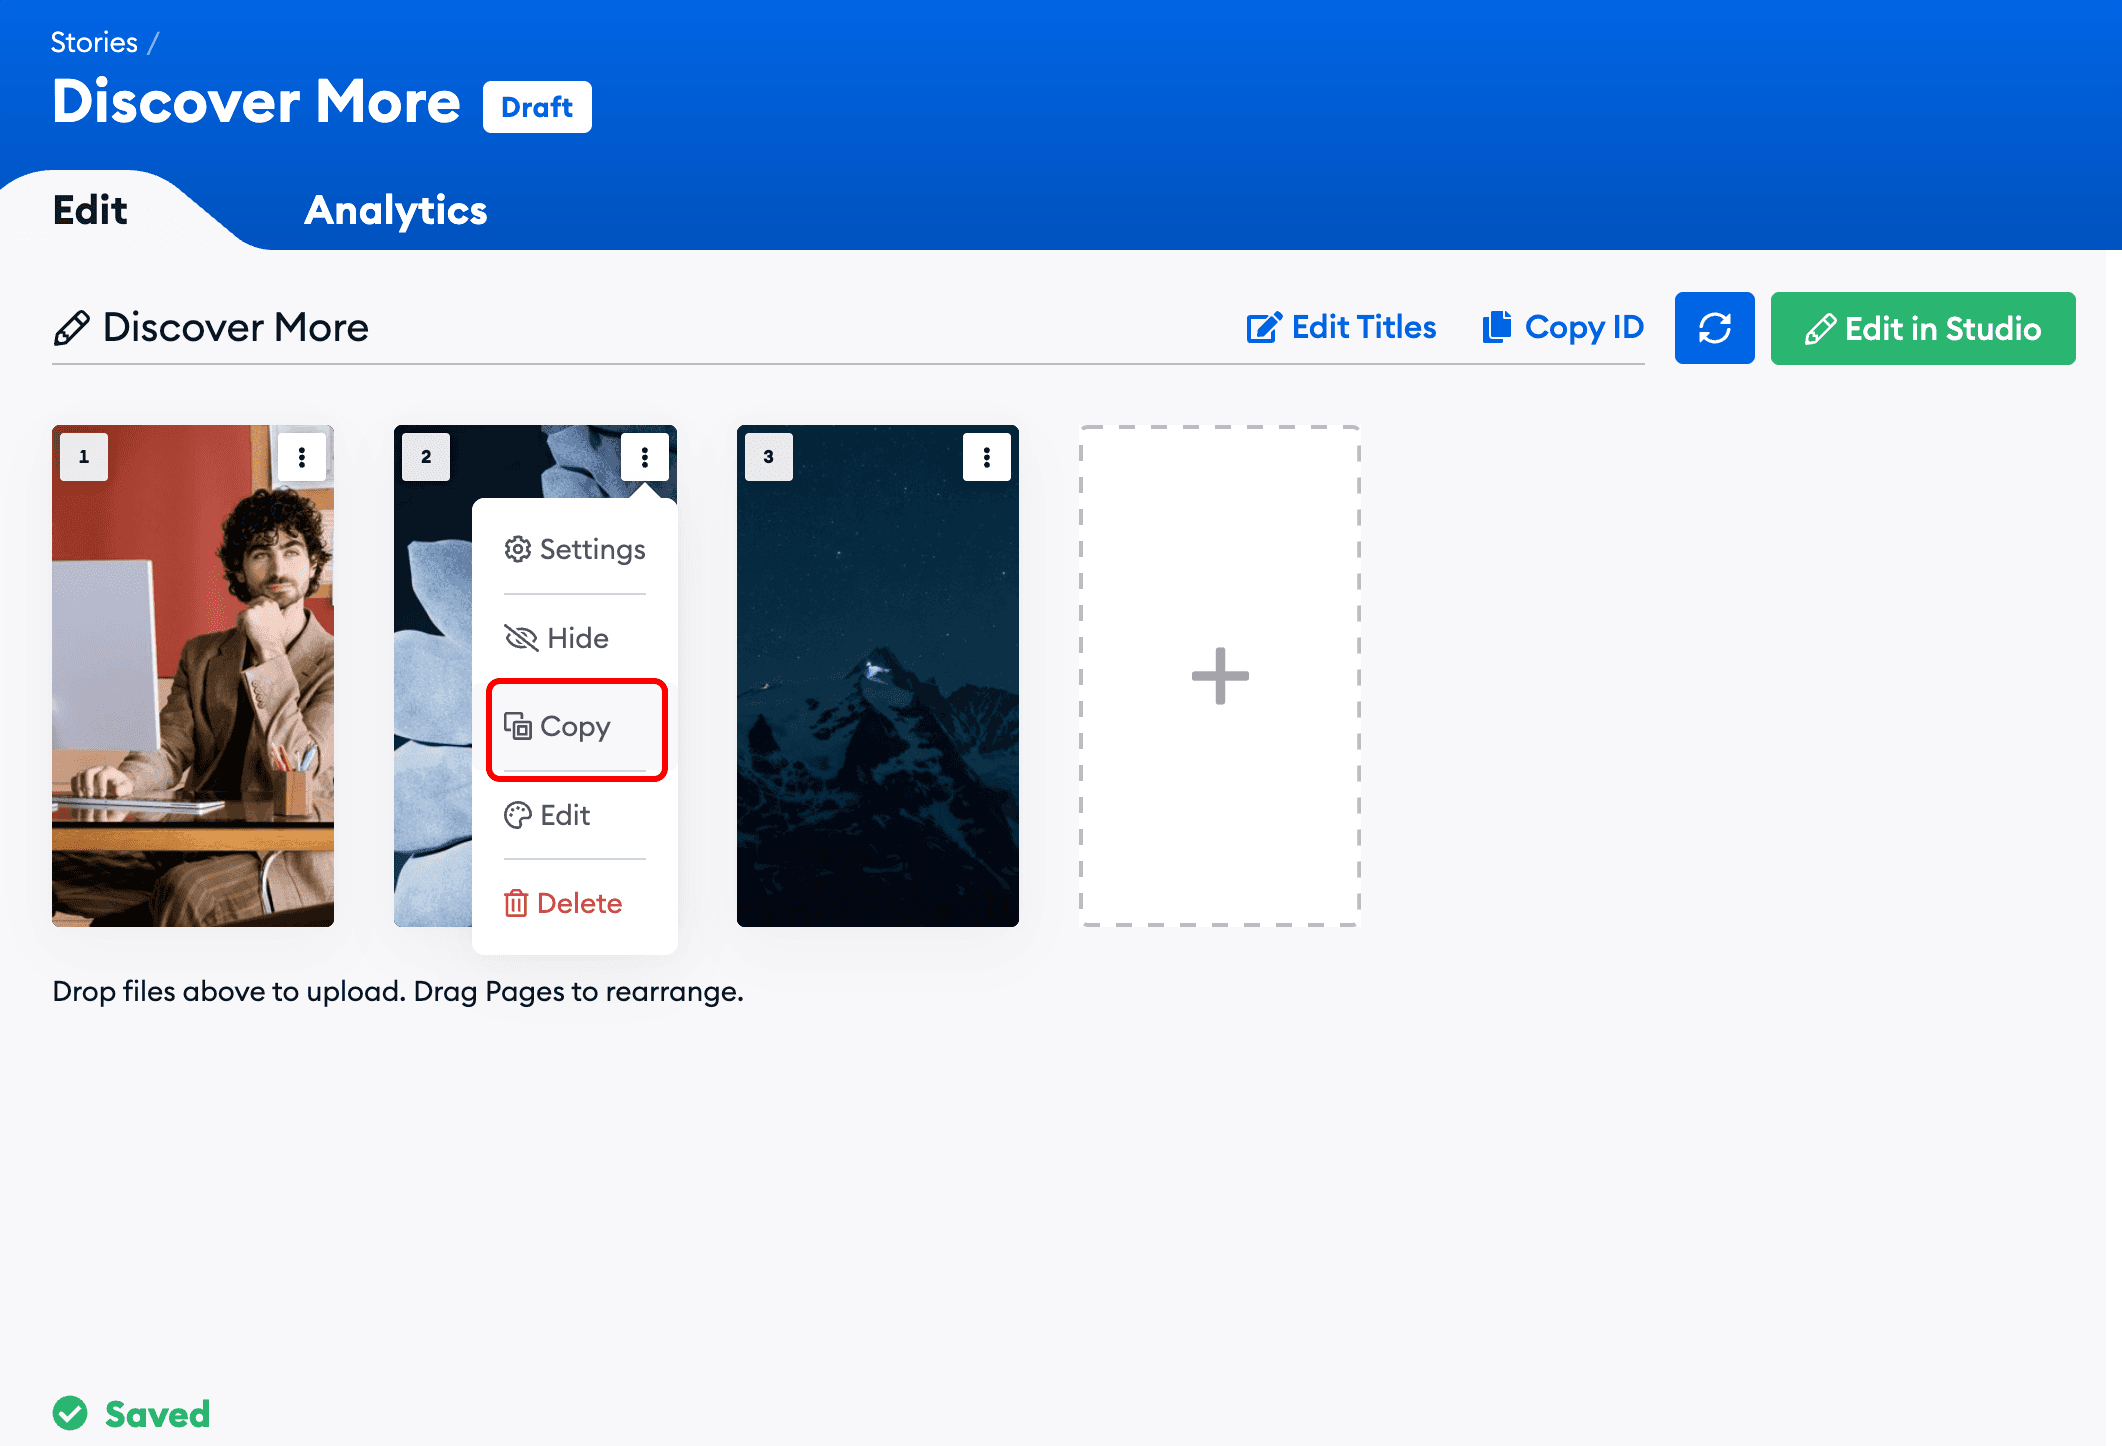
Copy Page
You can copy a page from one Story to one or more existing Stories — including any attached actions — or to a new blank Story.
To copy a page:
Click the three-dot menu at the top right of the page you want to copy.
Select Copy.
In the popup, select one or more existing Stories, or choose New Story.
Use the toggle to set whether the copied page is hidden or visible.
Click Copy to complete.
If copying to multiple pages a success toast appears listing clickable links to the Stories the Page was copied to
Delete Pages
To delete a Page:
Hover over the Page and click the delete button
After clicking the delete button, you will be given the opportunity to abort the deletion by clicking ‘Cancel’ or confirm it by clicking ‘Yes, Delete.’
Eyebrows
“Eyebrows” enhance the visibility and context of content within Stories. This feature allows the addition of an optional "Eyebrow" (a subtitle or tagline) that appears alongside the primary title on content thumbnails and within the content players.
To add an eyebrow:
Open the CMS and go to the relevant Story
Open Edit Titles
Navigate to the Eyebrow tab.
Enter Eyebrow Text:
There is a soft validation for text exceeding 20 characters. Users can enter titles longer than the limit, but if the title exceeds the limit, a warning message is displayed.
Click ‘Done’ to save changes.
Go to the top